Kyoti Makes…Nail Polish!!

23 Aug

I’ve still been crafting and creating, but nowadays I’m turning myself to other ventures: cosmetics! More specifically I’m designing and creating custom handmade nail polishes, and I’m really enjoying it. Most of my colors are inspired by geeky or nostalgic things from my life, and hopefully yours as well!

Here are just a few of my creations…

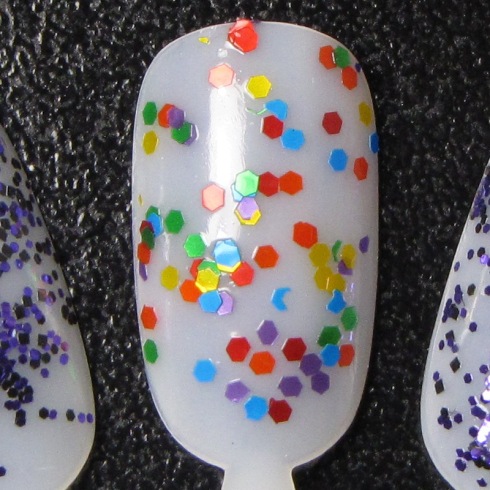
Pride (LGBT)

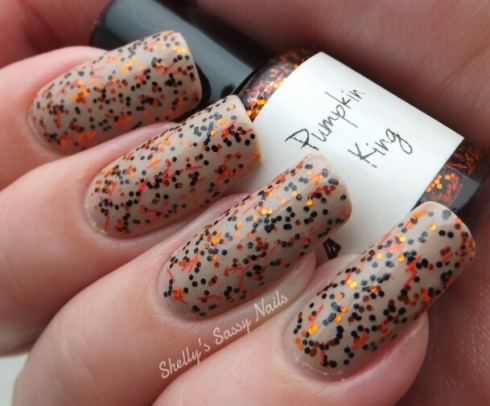
Pumpkin King (Nightmare Before Christmas)

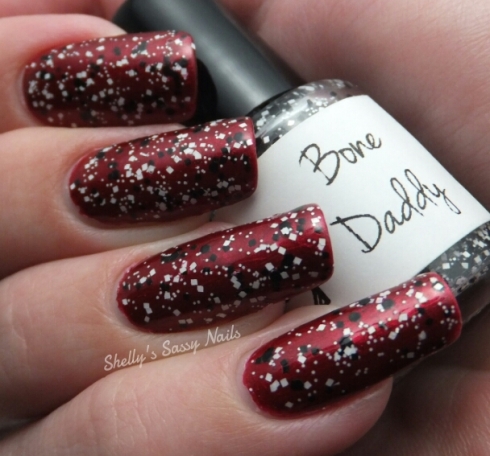
Bone Daddy (Nightmare Before Christmas)

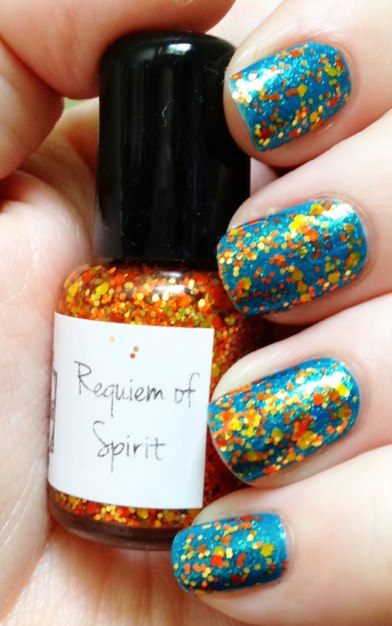
Requiem of Spirit (Legend of Zelda)

Use the code KyotiMakes for 10% off any purchase $10 or more! Click HERE to check out my shop!

Tutorial: The most awesome rainbow tiered skirt *ever*

30 Jun

A few days ago I was lurking around the internet, bored senseless, and not a single crafty project that sounded remotely interesting, then I stumbled across perhaps the most lovely skirt I’ve ever seen and I knew I had to have it. And so, I made one for myself!

Obligatory spin shot!


The San Diego LGBT Pride parade is coming up in about a month and I’m planning on marching in it. I just had to have this skirt in time for the parade! So that night I decided I was going to do it. I spent about 3 hours planning everything out and went to the store the very next day to get my supplies.

Turns out my 3 hours of planning was totally wasted! My initial measurements included over 1400 inches worth of fabric for the bottom tier! I also had wanted to copy the patchwork design of the original but I am not a patient lady. Thankfully the lady at the sewing counter suggested I just use strips of a single fabric (the poor lady probably thought I was going insane, I was sitting on the ground talking to myself and angrily scratching out numbers while looking at a million different quilting packs). Ok, so first simplification complete–this project seems more manageable now!

At this point I still planned on having about 1400″ of fabric for my final tier. I picked out my favorite fabric and calculated the costs. Over $60, ouch! Ok, so being a broke crafter I needed to bring that down a LOT. So instead of each tier being 1.5x the tier above it I figured I’d do 1.25x the tier above it. This brought my 1400″ final tier down to a “measly” 370–way more manageable. It also brought my costs down closer to $25, about what I’d pay in a store for a significantly-less-awesome skirt, which was easy to justify (especially after my initial estimate of costs, eesh!).

After congratulating myself on being both frugal and maintaining the inherent awesomeness of this project I spent the next 15 minutes or so having the sewing counter lady cut my fabric into chunks as small as 1/4 of a yard. All in all I spent over an HOUR just picking out fabric and figuring out exactly how much I needed. What’s worst is that I nearly forgot to grab extra thread on my way out! But I remembered before hitting the check-out lane and all was well. So, let’s give this thing a look, shall we?

Just after completion–I didn’t take it off all night!

Very tired, but so proud!

Outside in the sun

I tried to get progress shots of this but being so big and bulky it was pretty difficult, so this tutorial will mostly be words. if you need clarification just leave a comment and I’ll do my best to clear things up.

First, get your measurements. All the fabric I got came in 44″ lengths and I decided the easiest way to get my measurements was to do strips and just sew them into one longer strip, the seams mostly get hidden in the ruffles and even if the seams show…who cares? Cheaper is WAY worth it for this. The second measurement is how much of a yard I bought of the fabric.

  • Waist – 40″
  • Tier 1 (pink) – 50″ (1/4 yard)
  • Tier 2 (red) – 62.5″ (1.25x tier 1) (1/4 yard)
  • Tier 3 (orange) – 78″ (at this point I started to round the numbers) (1/4 yard)
  • Tier 4 (yellow) – 97″ (3/8 yard)
  • Tier 5 (light green) – 122″ (3/8 yard)
  • Tier 6 (dark green) – 152.5″ (1/2 yard)
  • Tier 7 (light blue) – 190.75″ (5/8 yard)
  • Tier 8 (dark blue) – 238.5″ (3/4 yard)
  • Tier 9 (light purple) – 298″ (7/8 yard)
  • Tier 10 (dark purple) – 372.5″ (1 and 1/8 yard)

To get my strips to the length I needed I cut everything into 4.5″x44″ strips, then measured my final length for that tier and evenly divided that amongst the strips. For example, tier 4 was 97″, I cut 3 strips and trimmed them to approximately 32.5″ each, then sewed them together to create the final 97″ strip.

Everything cut into strips and sewn to their final sizes

I decided to do the easiest step next: hemming the bottom tier. I did a simple fold, I didn’t even fold it under itself, though I may go back to hem it properly.

After that came the hardest part: figuring out how to ruffle 370″ of fabric @.@ I did it wrong TWICE before finally giving up and freehanding half of it. I used a basting stitch but pulled it far too tight. Despite the frustration I’m glad I started on the longest strip: every strip after it was easier and easier than the one before! By the time I got to the final strip I was breezing through them.

Ruffles, ruffles, everywhere!

After the disaster with the longest tier I (ok…my honey) devised a new way to “ruffle”: pleating! I divided each strip into smaller sections and pleated as I went. I started by folding my previous strip (let’s say dark green) and my current strip (light green) and pinning the very far sides together to keep them from coming apart. Next, fold everything in half and pin the middle of the light green to the middle of the dark green; I found the best way to do this was just hold the two sides together as high as you can and have a friend pin the bottom of the droops together. Continue this way to find the middles until you’ve pinned everything into more manageable lengths. I suggest using safety pins, by the way, because there’s a lot of movement involved in this process. Hopefully the following picture makes at least a little bit of sense!

Weird picture but the best I could take to show the pinning

When I was finally done sewing all of my strips together I added a strip of elastic for the waistband. I used the same pinning method but instead of pleating the fabric I pulled the elastic taut and allowed the fabric to scrunch itself up. Finally, I sewed the loooong seam up the back and the skirt was complete! It’s officially my favorite piece from my wardrobe :-)

Lush Slush Slushy Wine

16 May

I went to the Bernardo Winery with my sweetheart’s family for Mother’s Day on Sunday and we found a stall with a mix for wine slushies. I tried it and it tasted amazing! But…the mix they had was like $5, and it only made enough for half a bottle of wine. I told myself I could make it myself so easily, and I was right! It took maybe 5 minutes of work and I ended up with a really tasty, sweet, slightly gelled and slightly icey drink.

Ingredients
  • 2 cups wine (I used strawberry white Zinfandel)
  • 1 tbsp strawberry kiwi (or any other flavor) Jell-o mix
  • 1.5 tbsp sugar
  1. In a bowl, stir the gelatin in 1/4 cup wine until dissolved.
  2. In a small saucepan, allow rest of the wine to simmer, stir in the softened gelatin and sugar until dissolved and allow to cool. Transfer to a tight-sealing container.
  3. Freeze the mixture for about 3 hours, stirring occasionally.
  4. Stir thoroughly before serving.
 My honey and I both thought it was tasty! We’re not big alcohol drinkers but this was great. I could have drank the whole two cups’ worth on my own probably but I stuck with just half of it, so scale this recipe to suit your needs.
I just hope my sweetheart’s mom likes it as much as I do! :-)

Perler TARDIS tutorial

6 May

My Perler TARDIS post from a few days ago was a huge hit! I’ve gotten a few people asking for a pattern. And so, here’s my best attempt at a pattern and tutorial. I kind of made this up as I went so forgive me if it’s hard to understand.

Click for larger image

Materials

  1. Make all pieces as shown. Note when multiple pieces are needed. For example, the light blue box that says “Top x3” needs to be made 3 times. For the light at the top make sure you do the glow in the dark beads properly (see finished product below). Allow pieces to cool under something heavy to keep them flat.
  2. Using embroidery thread, stitch details onto perler pieces, being sure that they will look right when finished.
  3. Using embroidery thread, stitch the light blue “Top” pieces together with the thicker piece on top.
  4. Stitch the dark blue “Top” pieces onto the light blue pieces with the thicker piece in the middle connecting everything together.
  5. Snap the light together and slide the two prongs into the hole in the dark blue “Top” piece. Hot glue the prongs on the underside to keep it secure (either now or later). Set the whole top assembly aside.
  6. Snap the body of the TARDIS together and hot glue the joint securely from the inside.
  7. Snap base pieces (minus large square bottom) together. Turn TARDIS body upside down and hot glue the base pieces together, making sure to leave room for large square bottom.
  8. Quickly glue and place the large square bottom. I only glued along two sides as my hot glue was cooling too quickly. Do NOT attempt to melt the hot glue as you will damage your TARDIS.
  9. Turn TARDIS right side up. Snap Police Box pieces together and hot glue to the top of the body. Make sure to leave enough room that the lid (which we set aside before) will fit fairly level.
  10. Allow everything to cool and fill with anything you want–it’s bigger on the inside!!

Perler TARDIS

3 May

I haven’t entirely given up my crafty side! I’ve been focusing more on nail art recently but I still can’t give up on crafts. Most of the stuff I do isn’t worthy of a whole blog post but this….I’m really proud of this!

Perler beads are also known as fusible or hama beads. They’re little tubes of plastic that can be melted together to form various patterns. I’ve posted a few perler projects in the past and this is perhaps my most epic one.

The TARDIS is an integral part of the Doctor Who series; more or less, it’s a spaceship that can travel through time and space. I’ve really gotten into Doctor Who in recent months and I’ve been doing a lot of Doctor Who crafts: papercraft, 2D perler, cross stitch, and now 3D perler. As a side note, if anyone’s interested in a cross stitched TARDIS  (or anything else) let me know and we can talk prices, I absolutely love commissioned work!!

Now, on to the project!

The light on the top is made with glow in the dark beads, I embroidered the details, and everything is held together with a mixture of embroidery floss and hot glue. And yes, it’s bigger on the inside ;-) I think this is going to be my new desktop candy dish!

Raspberry Mocha Recipe

21 Apr

Have you tried Peet’s raspberry mocha? I’ve been there a few times on road trips and I just fell in love with them! Sadly, the nearest Peet’s is hours away and I can’t justify driving that far just for coffee, so I decided to try to make some at home!

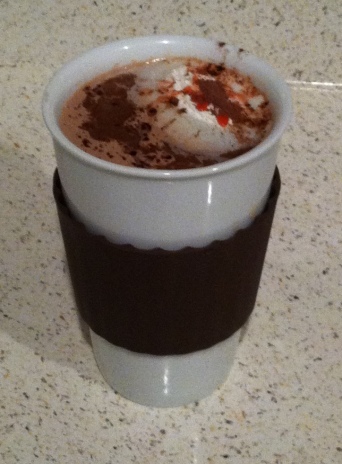
It's hard to make stuff look good just after waking up

Ok, so not as pretty as Peet’s but come on, I was trying to get this thing finished so I could drink it ;-) You wouldn’t like me before my morning coffee!

My mom (the genius she is–I got my brains from her!) actually first had the idea to make raspberry mochas at home. She got some sugar free raspberry coffee syrup and let me try it in my coffee. It was wonderful! I prefer the non-sugar free stuff though but hey, if Mom gives me coffee syrup I’m not gonna turn it down :-) The Torani syrups were a little outside my price range and I wanted something with a little more flexibility. Just a few days later I was shopping at Big Lots and found Daily’s brand raspberry daiquiri mix for $2.80! If you can find raspberry syrup made with real raspberries I’d suggest getting that but the daiquiri mix is delicious and is only lightly sweetened.

I’m sure I could use good chocolate for this but I just wouldn’t have much use for it other than for making mochas so I prefer the instant hot cocoa mixes. What’s great about this recipe is that it’s super simple, though to be honest I took pictures this morning before I’d had any coffee (hey, the mocha was gonna be my coffee!) and I very nearly forgot the cocoa mix…oops! What’s a raspberry mocha without the mocha?! That’s what I get for trying to think before my morning coffee ;-) Enough rambling, on to the recipe, shall we?

Ingredients

  • 14 oz fresh medium to strong brewed coffee
  • 1 tbsp raspberry syrup (adjust accordingly based on your syrup and personal tastes)
  • 1/2 packet instant hot cocoa
  • 1/2 tbsp sugar (adjust to taste)
  • 1 tbsp creamer (optional, adjust to taste, my preference is International Delight in French Vanilla or Cold Stone’s Sweet Cream)
  • dollop whipped cream (optional)
  • a bit of extra syrup and cocoa powder to garnish

This is another of those super simple recipes: mix everything but the whipped cream and garnish together, put it into a nice tall mug, and add the whipped cream and garnish. Sit back and enjoy your little piece of chocolate and raspberry heaven :-)

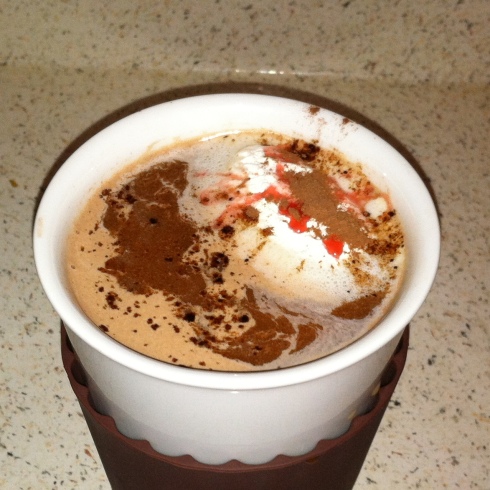
Oops...whipped cream started to melt. Still yummy!

Now if you’ll excuse me, I’m going to finish enjoying this.

Food Porn

15 Apr

Just wanted to share my delicious lunch on Friday. I made homemade sushi (which I’ve been doing a lot of lately since I’m barring myself from going to the little sushi place near my house) and I’m having tons of fun finding new fillings!

Friday’s rolls had tempura asparagus, cream cheese, and avocado in one; the other had tempura krab (which is amazing btw), tempura asparagus, cream cheese, and avocado. So. Freaking. Good. In retrospect I should have gotten a bigger plate but it just looked so indulgent on a little one.

If you’ve ever wanted to try making your own sushi, TRY IT! I used this recipe for the rice (having short grain rice is very important, splurge and spend the $7 to get a small bag of it) and just had fun trying combinations! I’m not comfortable using raw fish yet but I love krab! First, check out my picture, then look at my list of possible fillings.

Possible sushi fillings

Veggies

  • asparagus
  • bell pepper
  • mushrooms
  • onion
  • avocado
  • cucumber
  • carrot
  • Japanese radish

Proteins

  • fried tofu (which is next on my list to try; I’ll cut very thing strips and pan fry or deep fry them)
  • shrimp
  • krab
  • fish (make sure you get your fish from a reputable source–get to know your fishmonger!)
  • teriyaki beef

Misc

  • cream cheese
  • spicy mayo (mix mayo with sriracha)
  • sweet & sour sauce
  • eel sauce
  • wasabi
  • anything you can think of!! An important part of making sushi at home is just having fun and trying new things

Also, this is my 100th blog post!! Thank you to all of you who have stuck around through my hiatuses and sporadic updates. <3

It’s bigger on the inside!

12 Apr

What did I do tonight? Oh, nothing much, just turned my phone into a TARDIS! I must admit that I only recently started watching Doctor Who but I am so in love. I watched all of the new series within a month! If you haven’t seen it definitely check it out on Netflix Instant or buy it if you can. My favorite doctor has to be Ten, David Tennant <3

This was actually fairly easy once I tried to stop overcomplicating things. I made a template to fit into the back of my clear iPhone case, found a picture of the TARDIS that fit, cut it out, and just slapped it into my case! I actually specifically got the clear-back case so that I could do papercraft stuff and have it show through–I think ahead with my crafts!

Attempting to learn crochet…

11 Apr

I recently inherited a wide array of crochet hooks. Now, I’ve been wanting to learn to crochet for quite a while but never wanted to invest the, er, $3 or so to get a hook and it seemed completely over my head, so this was the perfect time for me to try my hand at crochet.

And guys? I’ve discovered something amazing. Crochet is magic! No, really, I watched a video and at a certain point the person just stopped making sense but they still ended up with a finished product!!

Ok, maybe it’s not quite magic, maybe I’m still just oblivious as to how this could possibly work. I guess I’ll just have to wait until I see my mom next so she can teach me what in the heck to do.

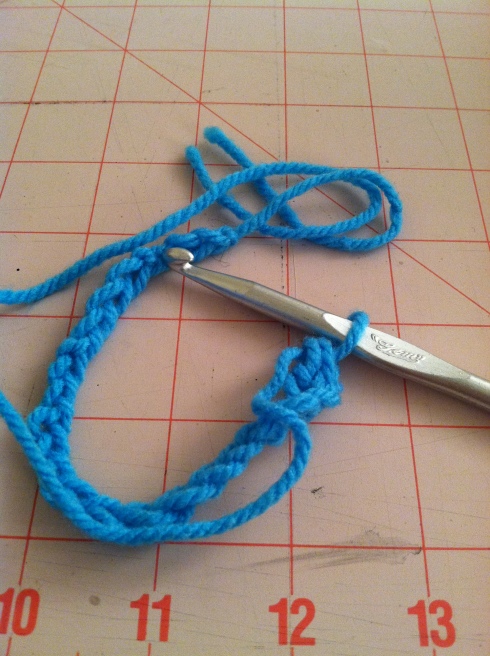
See? I tried! This is where I got lost.

Custom Starbucks Tumbler

8 Apr

So I’ve had this custom Starbucks tumbler for over a year now and I hadn’t done anything with it. I’d tried cross stitching an insert (which I can only find my 2/3 completed picture here) but it ended up being too thick to insert. So I’ve just left the blank black one in my tumbler for like 9 months. I’ve started using it again so I finally decided to just make something, but I wasn’t sure what I wanted to put on it.

Suddenly, it hit me–my friends have told me I look like Starbuck from the new Battlestar Galactica (which I may or may not believe but I appreciate the sentiment!) so I found an image saying “Starbuck’s coffee” and the Colonial logo that looked like the normal Starbucks logo. Snip snip, tape tape, ta-da! I’m very happy with this; it’s subtle but still custom.